Guides & How-To
Step-by-step guidance for using TreeSize Pro: scanning, finding large files, visual views, duplicate search, reporting, and troubleshooting.
Getting Started with TreeSize Pro
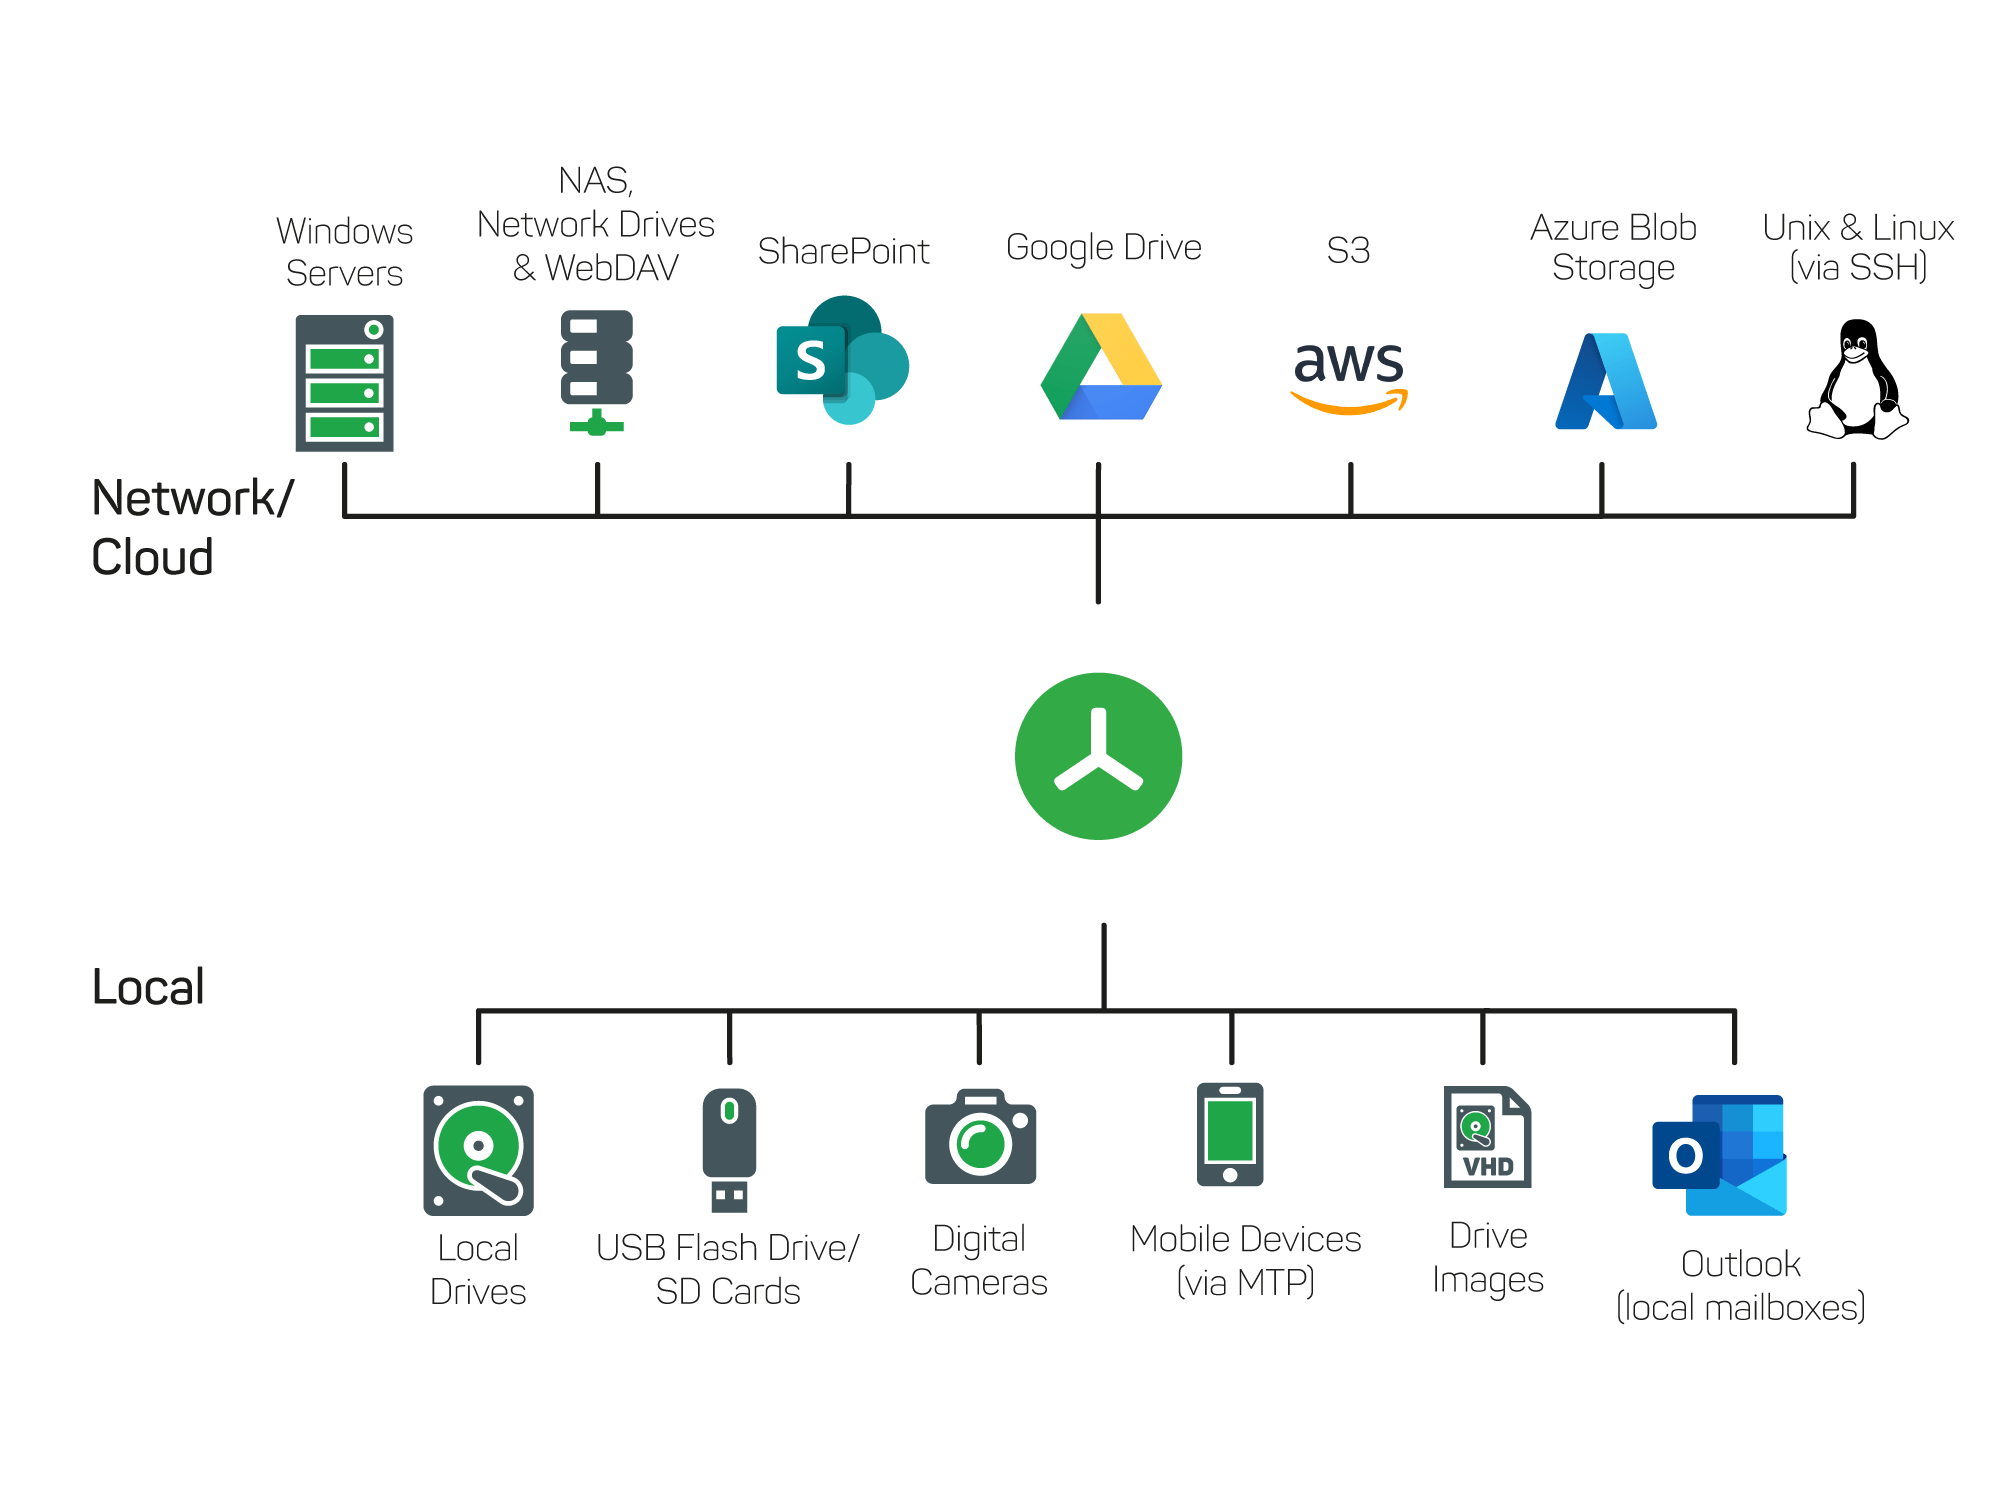
After installation, launch TreeSize Pro. You'll see an interface that lets you choose what to scan: a drive (e.g. C:), a specific folder, or a network path. Start with a single drive or a folder you know is large to get familiar with the tree view and size columns. Results appear as the scan runs, so you can expand folders and explore while the analysis continues in the background.
Best practices
Run your first scan on a medium-sized folder so results appear quickly. Use the treemap view once the scan has enough data to see how visualization helps spot large consumers.
How to Scan a Drive or Folder Efficiently
Select the drive or folder you want to analyze from the scan start screen or the menu. For local drives, choose the root (e.g. C:\) for a full-disk analysis, or a subfolder to limit scope and speed up the scan. For network locations, enter the UNC path (e.g. \\server\share). Start the scan and let TreeSize Pro run; it uses multithreading so you see partial results early.
- Open TreeSize Pro and choose Scan or the equivalent option to pick a path.
- Select the drive letter, folder, or network path to analyze.
- Start the scan. Avoid modifying the scanned location while the scan is running for accurate results.
- Use the tree view to expand folders and inspect sizes as data arrives.
How to Identify Large Folders and Files
The default tree view sorts folders by size (descending), so the largest folders appear at the top. Expand any folder to see its subfolders and files, also sorted by size. To focus on the very largest files across the whole scan, use the "Largest Files" or similar view/filter if available in your edition—this lists the top space-consuming files regardless of depth in the tree.
- Run a scan on the drive or folder of interest.
- In the tree view, look at the size column; the largest items are at the top after sorting by size.
- Expand large folders to see which subfolders or files contribute the most.
- Use filters (e.g. "files larger than X MB") to list only oversized files for cleanup planning.
For more on filters and search, see Advanced File Search & Filtering and the section below on filtering.
How to Use Visual Views to Understand Disk Usage
Switch to the treemap or chart view to see disk usage visually. The treemap shows each folder or file as a rectangle; larger rectangles mean more space. Click a block to drill down. Bar charts and list views can show size, file count, or percentage—use the view options to sort and switch between "size" and "allocated" if your edition supports it. These views help you answer "what's using my disk?" without reading every row.
- After or during a scan, open the view switcher (e.g. Tree / Treemap / Chart).
- Choose Treemap for a proportional, at-a-glance view of what occupies space.
- Use the tree or list view sorted by size when you need exact numbers and names.
- Combine with filters (file type, size) to focus the visual on specific categories.
How to Search for Duplicate Files
TreeSize Pro includes a duplicate file finder. Open the duplicate search from the menu or toolbar, choose the scope (e.g. the current scan or a path), and set criteria (e.g. same name, same size, or content-based). Run the search; results group identical or duplicate files so you can decide which copies to keep and which to remove or archive.
- Start a scan or open an existing scan result that includes the folders you want to check.
- Open the duplicate file search feature (menu or toolbar).
- Set the scope and matching options (name, size, content/hash as available).
- Run the search and review the duplicate groups.
- Select which copies to keep; delete or move the rest only after confirming they are safe to remove.
Pro tip
Always verify duplicate groups before bulk deletion. Keep at least one copy in a location you trust and ensure you're not removing the only instance of an important file.
How to Use Filtering for Faster Investigation
Use the built-in filters to show only files that match your criteria: for example, files larger than 100 MB, files older than 365 days, or files with specific extensions (e.g. .mp4, .zip). Filtering narrows the list so you can focus on likely cleanup candidates or on a particular file type that's growing. Combine with the tree or list view to see filtered results in context.
- Open the filter or search panel in TreeSize Pro.
- Set conditions: minimum size, date range, extension, or other supported criteria.
- Apply the filter; the view updates to show only matching items.
- Use the results to plan deletion, archiving, or further analysis.
How to Export Storage Reports
After a scan, use the report or export function to generate a storage report. Choose the output format (PDF, Excel, HTML, CSV, or XML as supported by your edition), configure options such as depth or columns, and run the export. Save the file to a location where you can share it or archive it for audit and documentation.
- Complete a scan or load an existing scan result.
- Open the Report or Export menu and select the desired format (e.g. PDF, Excel).
- Adjust scope and options (e.g. include subfolders, top N items, columns).
- Choose a save path and start the export.
- Use the generated report for meetings, capacity planning, or compliance documentation.
For more on reporting features, see Reporting & Export.
How to Compare Storage Growth Over Time
To see where storage has grown, you need at least two scans of the same (or comparable) path at different times. Run a scan and save or keep the result; later, run another scan and use the "Compare" or "Growth" feature to diff the two. The comparison highlights new, deleted, and changed folders/files and shows size deltas. Use this for capacity planning and to identify folders that need cleanup.
- Run and save (or keep) a baseline scan of the drive or folder.
- After a period (e.g. a week or month), run another scan on the same path.
- Open the comparison or growth feature and load the two scans.
- Review the differences to see what grew and by how much.
How to Use TreeSize Pro in Professional Environments
In IT and business environments, use TreeSize Pro for: (1) regular scans of file servers and network shares to monitor usage; (2) scheduled tasks to run scans and export reports on a schedule; (3) command-line integration so scripts or deployment tools can trigger scans and reports; (4) sharing exported reports with management or clients for capacity and cleanup decisions. Ensure you have appropriate permissions to scan the target paths and that your use complies with organizational policies.
For automation, see the publisher's documentation on command-line parameters and Task Scheduler. For more features, see Features.
Best Practices for Storage Cleanup and Reporting
- Scan before you delete. Use TreeSize Pro to identify large and duplicate files, then decide what to remove; don't delete blindly.
- Keep a baseline. Save or export a scan before major cleanup so you can compare before/after and report on space reclaimed.
- Filter by type and age. Use filters to focus on temporary files, old installers, or specific extensions that are safe to review for deletion.
- Export reports regularly. For servers and shared storage, schedule scans and reports so you have a history for capacity and audit.
- Verify duplicates. Before removing "duplicates," confirm they are truly redundant and that you're keeping the right copy.
Best practices
Always have a backup or recovery plan before bulk deletion. TreeSize Pro helps you find what to delete; you are responsible for ensuring that deletions are appropriate and authorized.
Common Problems and Solutions
TreeSize Pro is not showing the expected folder size
Ensure the scan has completed for that branch; partial scans may show incomplete sizes. If you're comparing to Windows Explorer, note that Explorer may show "size on disk" or only direct children—TreeSize shows cumulative size including subfolders. Run a full scan and expand the folder to see the total. Check that you have read permissions for all subfolders.
Scan results are taking longer than expected
Large drives, network paths, and paths with millions of files will take longer. Use a more specific folder instead of the whole drive for quicker results. Ensure the target is not being heavily used by other processes. For network paths, network speed and server load affect scan time.
Large files are hard to identify in deep folder structures
Use the "Largest Files" view or filter by "file size greater than X" to list the biggest files across the entire scan regardless of depth. Then use "Open containing folder" or similar to navigate to them. The treemap view also surfaces large blocks even when they're nested.
User wants to prepare a storage usage report for management
Run a scan on the relevant drive or share, then export a report to PDF or Excel. Choose a format and depth that fits your audience (e.g. top-level summary vs. detailed tree). Schedule recurring scans and exports if you need regular reports. See How to Export Storage Reports above.
User needs to find duplicate files before cleanup
Use the duplicate file finder: set the scope to the scan or path, choose matching criteria (name, size, content), and run the search. Review the groups and decide which copies to keep; then delete or archive the rest. See How to Search for Duplicate Files above.
User wants a better workflow for recurring analysis
Use command-line parameters to run TreeSize Pro from scripts, and use Windows Task Scheduler to run those scripts on a schedule. Configure the command to scan a path and export a report to a fixed location (or email). See the publisher's documentation for exact parameters and examples.
User wants to inspect shared or network-based storage more efficiently
Add the network path (UNC) as the scan target. Ensure you have read access and that the path is reachable. Run the scan during a quiet period if the share is large. Use filters to focus on specific file types or sizes so you don't have to browse the entire tree. Export reports so you can review them without rescanning every time.
Technical Reference – Command-Line & Automation
TreeSize Pro supports command-line parameters for scanning paths and exporting reports. Use these in scripts or Windows Task Scheduler for automated disk usage analysis. The tool does not modify registry keys; it only reads file system data and can write reports to the paths you specify. Refer to the publisher's documentation for the exact syntax of your installed version.
Example: Scan a drive and output path
TreeSizePro.exe /scan "C:\" /export "C:\Reports\scan-results.html"Example: Scan network path and export to CSV
TreeSizePro.exe /scan "\\server\share\Data" /export "C:\Reports\storage-report.csv"Example: Scheduled task (batch)
@echo off
set TREE="C:\Program Files\TreeSize Pro\TreeSizePro.exe"
set REPORT=C:\Reports\weekly-%date:~-4,4%%date:~-10,2%%date:~-7,2%.html
%TREE% /scan "D:\" /export "%REPORT%"Parameter names and paths may vary by version. Check the official TreeSize Pro documentation for current command-line options.